Tools
7MP Management and Planning Tools
8QC Traditional Quality Control Tools
Failure Mode, Effects, and Criticality Analysis
Maintainability and Availability
Process Decision Program Charts
Check Sheets
An excerpt from the Handbook for Quality Management (2000, QA Publishing, LLC) by Thomas Pyzdek
Check sheets are devices which consist of lists of items and some indicator of how often each item on the list occurs. In their simplest form checklists are tools that make the data collection process easier by providing pre-written descriptions of events likely to occur. A well-designed check sheet will answer the questions posed by the investigator. Some examples of questions are: “Has everything been done?” “Have all inspections been performed?” “How often does a particular problem occur?” “Are problems more common with part X than with part Y?” They also serve as reminders that direct the attention of the data collector to items of interest and importance. Such simple check sheets are called confirmation check sheets. Check sheets have been improved by adding a number of enhancements, a few of which are described below.
Although they are simple, check sheets are extremely useful process-improvement and problem-solving tools. Their power is greatly enhanced when they are used in conjunction with other simple tools, such as histograms and Pareto analysis. Ishikawa estimated that 80% to 90% of all workplace problems could be solved using only the simple quality improvement tools.
Process check sheets
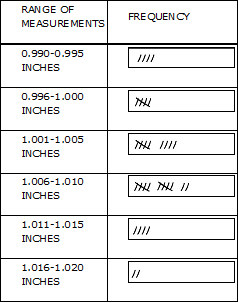
These check sheets are used to create frequency distribution tally sheets that are, in turn, used to construct histograms (see below). A process check sheet is constructed by listing several ranges of measurement values and recording a mark for the actual observations. An example is shown in Figure VI.14. Notice that if reasonable care is taken in recording tick marks the check sheet gives a graphical picture similar to a histogram.

Figure VI.14. Process check sheet.
Defect check sheets
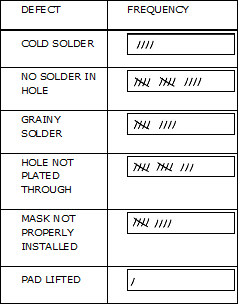
Here the different types of defects are listed, and the observed frequencies recorded. An example of a defect check sheet is shown in Figure VI.15. If reasonable care is taken in recording tick marks the check sheet resembles a bar chart.

Figure VI.15. Defect check sheet.
Stratified defects check sheets
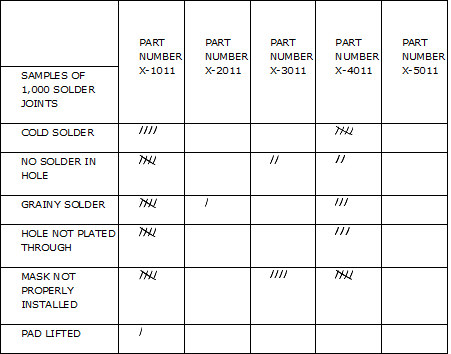
These check sheets stratify a particular defect type according to logical criteria. This is helpful when the defect check sheet fails to provide adequate information regarding the root cause or causes of a problem. An example is shown in Figure VI.16.

Figure VI.16. Stratified defect check sheet.
Defect location check sheet
These “check sheets” are actually drawings, photographs, layout diagrams, or maps which show where a particular problem occurs. The spatial location is valuable in identifying root causes and planning corrective action. In Figure
VI.17 the location of complaints from customers about lamination problems on a running shoe are shown with an “X.” The diagram makes it easy to identify a problem area that would be difficult to depict otherwise. In this case, a picture is truly worth a thousand words of explanation.

Figure VI.17. Defect location check sheet (lamination complaints).
Cause-and-effect diagram check sheet
Cause-and-effect diagrams can also serve as check sheets. Once the diagram has been prepared it is posted in the work area and the appropriate arrow is marked whenever that particular cause or situation occurs. Teams can also use this approach for historic data, when such data is available.
Learn more about the Quality Improvement principles and tools for process excellence in Six Sigma Demystified (2011, McGraw-Hill) by Paul Keller, or his online Green Belt certification course ($499).


