Tools
7MP Management and Planning Tools
8QC Traditional Quality Control Tools
Failure Mode, Effects, and Criticality Analysis
Maintainability and Availability
Process Decision Program Charts
Repeatability Reproducibility Analysis
by Paul A. Keller, CQE, CQA, CQM
A recent column discussed how to conduct an R&R Study. Once the data has been gathered, we can analyze R&R studies using SPC software to learn more about our Measurement System.
In this example, three Operators measured 10 pieces 3 times (trials) each. The repeatability reproducibility analysis was conducted so that each Operator (one at a time) was presented one of the pieces (selected randomly from the 10 pieces), and asked to measure the piece using their regular measurement procedure for that product. The Operator repeated this measurement process for the other 9 pieces, then was presented the same 10 pieces (in random order) for the second trial, then again for the third trial. This same study procedure was used for each Operator.
The data is shown below, and can be copied and pasted into either our SPC IV Excel or QA-Calibrate software for rapid Gage R&R analysis. Readers with this software may wish to follow along in the software; others may wish to download a free 30-day trial of our software for Gage R&R analysis.
We can calculate a statistic known as R&R, representing the amount of variation associated with Repeatability and Reproducibility. Using the Gage Analysis portion of the Quality America QA-Calibrate software, we calculate the Total R&R as 5.8943.
This statistic by itself is of limited value. We are generally more interested in how this value compares to requirements. Recall from the earlier article that we use our measurement system for two main purposes: to determine product acceptability, and to determine process control. Using these as our requirements, we then compare the the Gage R&R calculation to both the Tolerance (Product Specifications), and the Process Sigma. For this data, predicting 99% of the area under the Normal distribution curve (5.15 sigma level) :
% Tolerance = 5.8943 / (59.0 - 55.0) = 147.4 %
where 59.0 and 55.0 are the upper and lower product specifications, respectively.
% Process Variation = 5.8943 / (5.15 * 2.8241) = 40.5 % *
where 2.8241 is the estimate of process sigma (in this case, based on the R&R Study data, but best if based on longer term SPC data, if available).
* Note: AIAG (Automotive Industry Action Group) now refers to this statistic exclusively as % R&R, although in the past some industry groups have used either the % Tolerance or % Process Variation as % R&R. Historically, this change is coincidental with the increased awareness of process control rather than mere product acceptability. The AIAG Measurement Systems Analysis Reference Manual also includes a statistic %PV (%Part Variation), which in this case is 91.4%.
Industry recommendations are generally that each of these numbers should be less than 10%. Values greater than 10% of Tolerance can cause acceptance of product that is out of spec and rejection of product that is within spec. Values greater than 10% of Process Sigma will contribute to errors in control limit calculations, false alarms and failing to detect true process shifts.
Since each of these statistics are well above 10%, this measurement system is unacceptable. In this case, the error is entirely due to Repeatability error (the Reproducibility error drops to zero once it has been corrected to remove the statistical effects of the Repeatability error). Since Repeatability is synonymous with Equipment variation, our logical focus would be those causes of measurement variation that are inherent to the measurement equipment, rather than the personnel.
But is there more information lurking in the data of R&R studies?
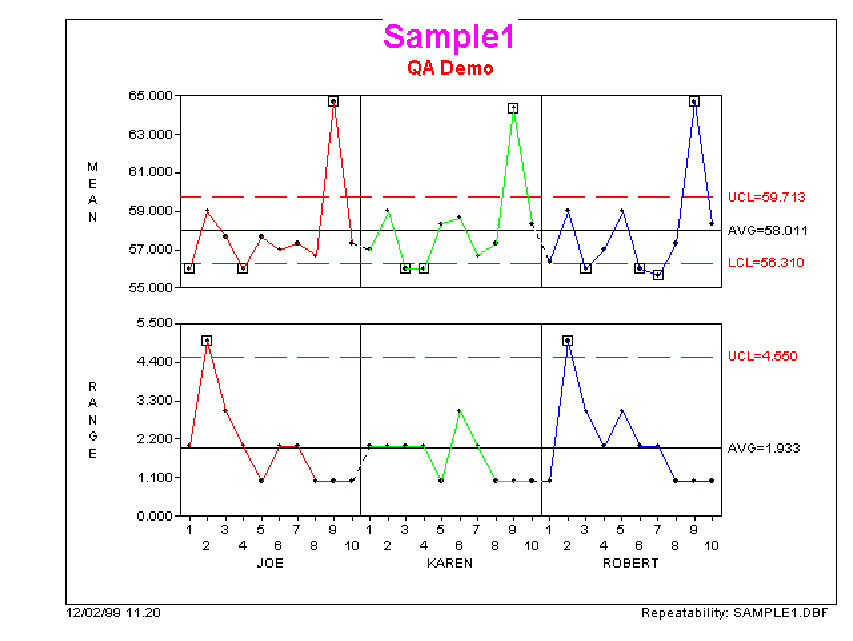
We can view a control chart of the Repeatability error, below. We notice immediately that there are many out of control points. Actually, this is good. In fact, we would like a majority of the points to be out of control on the X-Bar (or Mean) chart! Sounds odd, until you consider how the control chart is constructed. Each point on the Range chart represents the trial to trial variation of the measurements for a given Operator of a given piece. The Average of these Ranges is then used to calculate the control limits on the X-Bar chart. These X-Bar chart control limits, then, provide an indication of the trial to trial variation. It is desirable that this variation is small relative to the variation seen in the pieces, which are indicated by the pattern of the plotted points. Therefore, having many plotted points outside the control limits implies the variation in the pieces is much larger than the Repeatability error, and the real process variation can be detected.

So, the fact that the majority of the points are within the control limits indicates that the Repeatability error is high relative to the part to part variation, which we saw in the statistics above. No new information there.
Notice however that the Repeatability error for Piece 2 is out of control (different from the rest) for both Joe and Robert, but not for Karen. This observation, and a search for its cause, could lead to a better understanding of the measurement process. Perhaps there is something odd about Piece 2 (a burr maybe, or some other within-piece variation) that should have been detected and accounted for. Or perhaps Karen has a better measurement technique, that is not susceptible to whatever the cause of the increased Repeatability error observed by Joe and Robert.
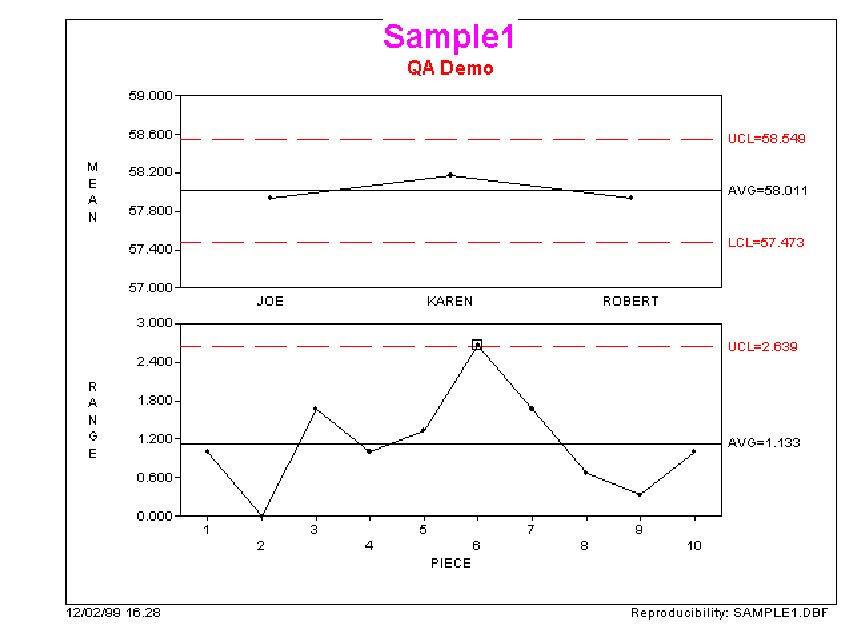
A control chart of the Reproducibility error is shown below. The Mean chart shows comparable Piece Averages for each Operator, signifying a negligible Reproducibility error. Although this error was calculated to be negligible (above), there is still information on the Range chart. Notice how Piece 6 has higher Reproducibility error than the other pieces. Another clue for discovering the sources of Measurement Error!

See also:
Interpreting the Gage R&R Statistic
Data used for analysis:
|
Piece |
Joe |
Karen |
Robert |
|
1 |
56 |
57 |
56 |
|
|
55 |
58 |
57 |
|
|
57 |
56 |
56 |
|
2 |
57 |
60 |
62 |
|
|
62 |
58 |
58 |
|
|
58 |
59 |
57 |
|
3 |
56 |
57 |
55 |
|
|
58 |
55 |
58 |
|
|
59 |
56 |
55 |
|
4 |
57 |
56 |
56 |
|
|
55 |
57 |
57 |
|
|
56 |
55 |
58 |
|
5 |
58 |
59 |
57 |
|
|
58 |
58 |
60 |
|
|
57 |
58 |
60 |
|
6 |
57 |
60 |
55 |
|
|
58 |
59 |
57 |
|
|
56 |
57 |
56 |
|
7 |
58 |
58 |
55 |
|
|
58 |
56 |
55 |
|
|
56 |
56 |
57 |
|
8 |
57 |
57 |
57 |
|
|
57 |
58 |
58 |
|
|
56 |
57 |
57 |
|
9 |
65 |
64 |
65 |
|
|
65 |
64 |
64 |
|
|
64 |
65 |
65 |
|
10 |
58 |
58 |
58 |
|
|
57 |
58 |
59 |
|
|
57 |
59 |
58 |
Learn more about the Quality Improvement principles and tools for process excellence in Six Sigma Demystified (2011, McGraw-Hill) by Paul Keller, or his online Green Belt certification course ($499).


