Tools
7MP Management and Planning Tools
8QC Traditional Quality Control Tools
Failure Mode, Effects, and Criticality Analysis
Maintainability and Availability
Process Decision Program Charts
Interpreting a Repeatability Control Chart

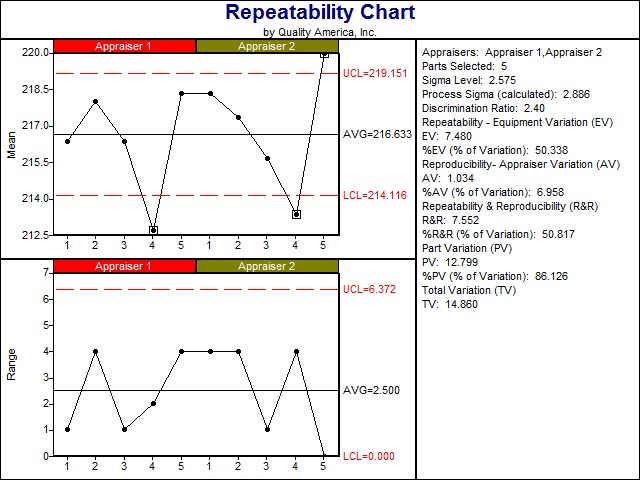
Repeatability Control Charts are constructed by grouping trials for each part for each Appraiser into a single subgroup. Therefore, the size of the subgroup is equal to the number of trials per part. The variation within a subgroup is an estimate of the repeatability error inherent to the measurement equipment, so long as the variation is shown to be statistically stable over all parts and all Appraisers. This assumption may be proven by observing the Range (or Sigma) chart for Repeatability.
The Range (or Sigma) chart should be in statistical control (all the plotted groups within the control limits. Each plotted group represents the variation observed between the trials for the given part by the given Appraiser. If a given part is out of control, the implication is that the variation observed between the trials for that part was larger than should be expected (based on the variation observed for the other parts). Perhaps the part had a burr or some other abnormality associated with it. That suspicion grows if out of control is observed for the same part in measurements from more than one Appraiser.
Sigma charts are used instead of Range charts when the subgroup sample size (in this case, the number of trials per part) is more than ten. This is due to the decreasing efficiency of the range as an estimate of the standard deviation at larger subgroup sizes.
The X-bar chart for Repeatability is analyzed quite differently than most X-bar charts. The plotted statistic, X-bar, is the average of each subgroup (in this case, the average of trials for a given part from each Appraiser). These X-bar vary as an indication of part-to-part variation. The control limits, however, as referenced in the links below, are calculated using the average range between trials for each part, which provides an indication of measurement equipment error. It is desirable that the measurement system detects real part differences in the presence of this measurement error. For that reason, the variation that is observed from subgroup to subgroup (i.e. part to part fluctuations) should be larger than the measurement errors (i.e. control limits), meaning that many subgroups should be out of control on the X-bar chart for Repeatability. AIAG recommends that at least half the subgroups exceed the X-bar control limits.
The Repeatability Control Charts are available in two formats: Combined and Per Appraiser. The Combined charts are those typically used to analyze statistical stability of the measurement system across selected Appraisers and parts. The "Per Appraiser" charts are provided to estimate Repeatability from each Appraiser independently. The Repeatability from to each Appraiser may then be compared to indicate possible training benefits.
See also:
Interpreting the Gage R&R Statistic
Repeatability X-Bar Chart Calculations: Combined Appraisers
Repeatability Range Chart Calculations: Combined Appraisers (If (2 ≤ Number of Trials ≤ 10)
Repeatability Sigma Chart Calculations: Combined Appraisers (If (Number of Trials > 10)
Repeatability X-Bar Chart Calculations: Per Appraiser
Repeatability Range Chart Calculations: Per Appraiser (If (2 ≤ Number of Trials ≤ 10)
Repeatability Sigma Chart Calculations: Per Appraiser (If (Number of Trials > 10)
Learn more about the Quality Improvement principles and tools for process excellence in Six Sigma Demystified (2011, McGraw-Hill) by Paul Keller, or his online Green Belt certification course ($499).


